Creating a Template in my DAW

Hello all!

I am curious about the best way to create a template in my DAW.
I created the one I use now about 2 years ago when I knew very little about music production.
Is there a guide to this?

I understand putting all instruments that I would use in my template, but I get lost when it comes to setting panning locations, grouping like instruments where I can put one effect on the folder and it applies it to all of them.

I would like to have a very production friendly template that has everything set as I need it when I open it. This will make me even more efficient as a composer.

Thanks in advance, and I appreciate any help you have to give.

I guess the workflow will depend on which DAW you’re using. I’m using Nuendo and here’s my workflow:

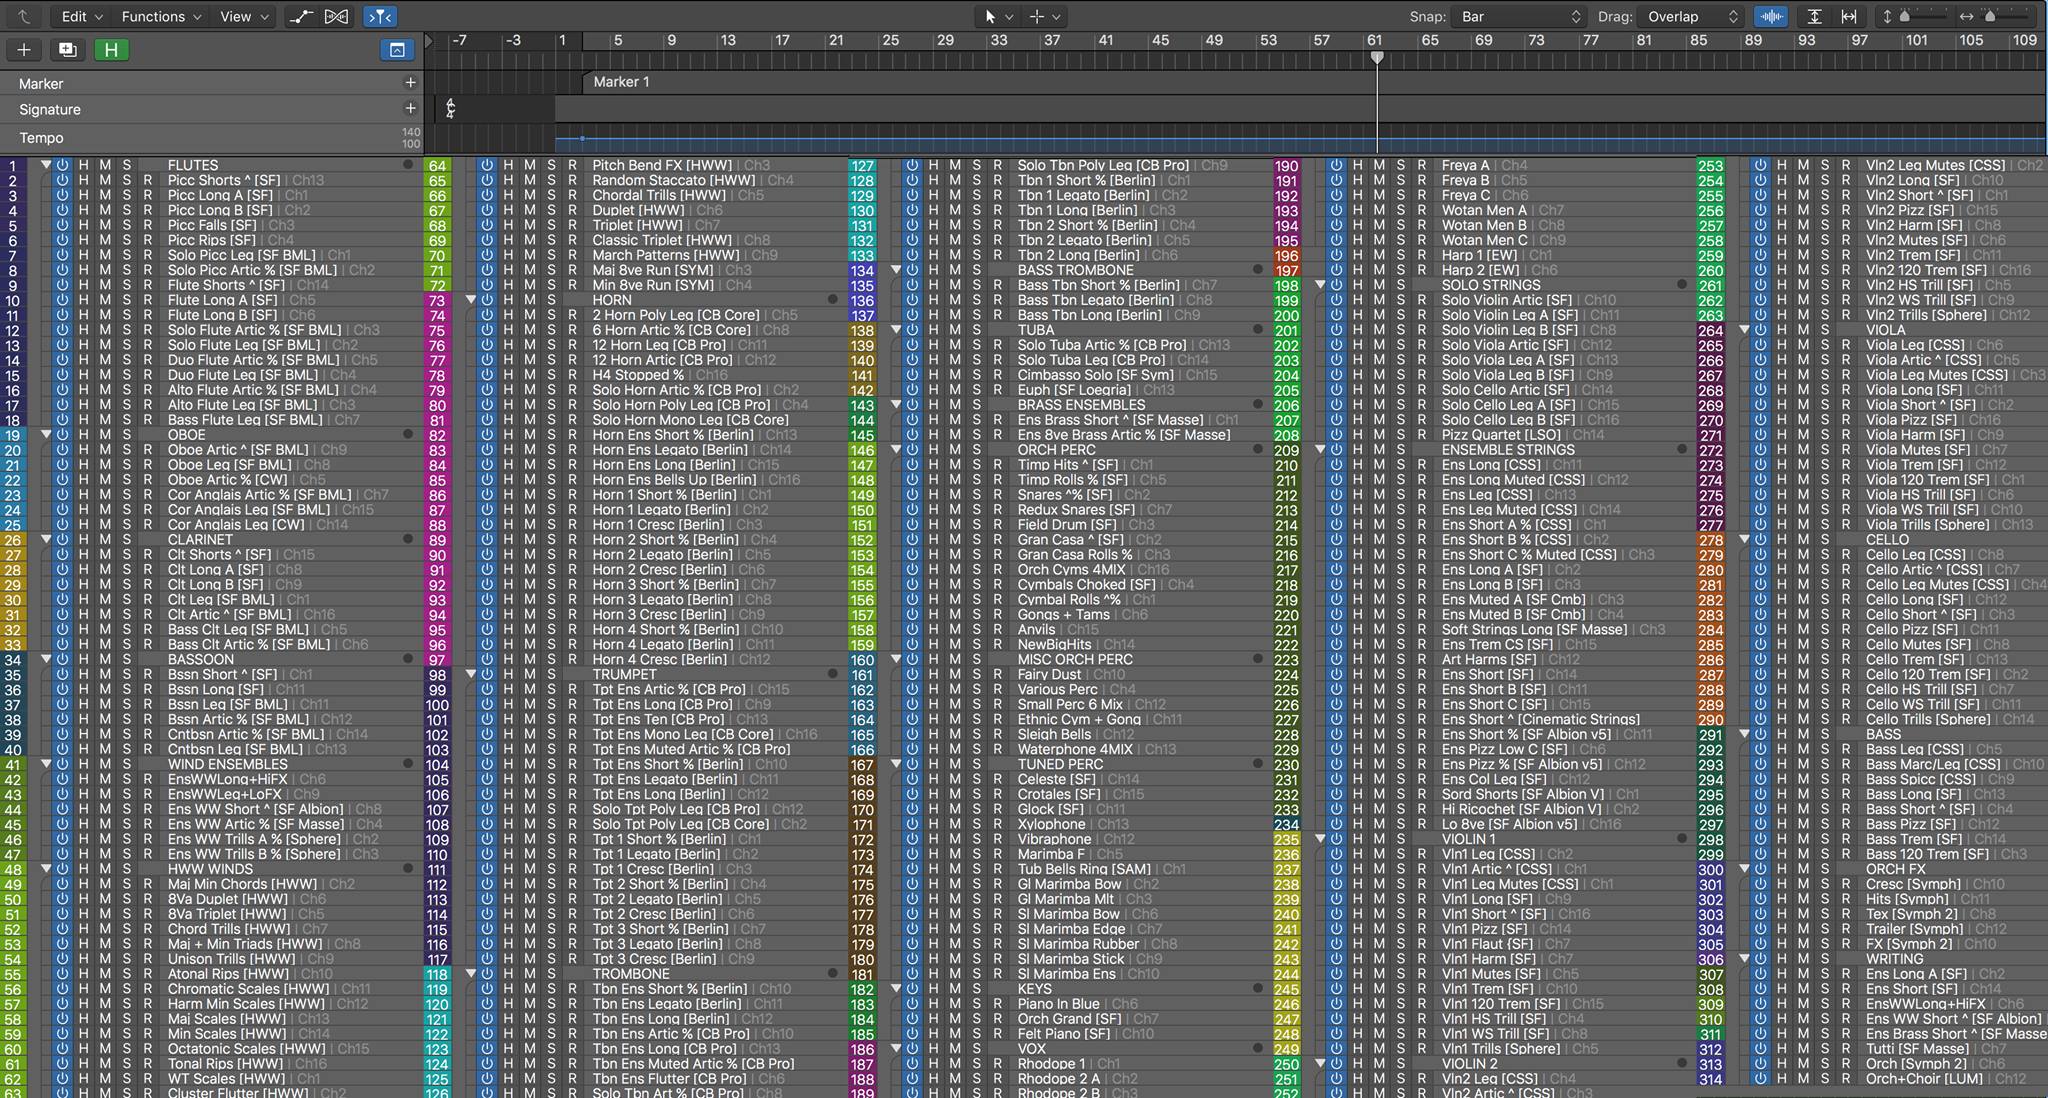
TRACK ORGANIZATIONS:

  • Tracks organized in orchestral score order and by family: (Woodwinds, Brass, Percs, and Strings).
  • Each family is a folder track that contains the instruments tracks.
  • Each track is routed to its corresponding group tracks.

GROUP TRACKS:

All the tracks are routed to groups so I don’t waste time when I need to do stems, I simply tick the group tracks and within a minute, I have pretty much all my stems.

My woodwinds, brass and strings stems are named as so:

  • Strings High
  • Strings Low
  • Strings Ensemble
  • Strings Solo

Percussion groups are a bit different (Perc Low, High, Metal, Keyboard, Ethnic)
As for the harp and choir, they get their own stems.

WORKFLOW OPTIMIZATION

In Cubase/Nuendo you can use the Zones feature (at 1:49) to pin the group tracks on one side in the mixer panel so you can always see them.

For optimization, all my instrument tracks are disabled by default. This way, my template opens instantly when I start a blank project and I enable the instruments as I go.

Tips: I use the track visibility configuration a lot to only display a specific group of instruments, very useful. You can map it to a controller such as a Streamdeck or good old keyboard shortcuts.

If you’re creating a template geared towards film scoring, you will need to insert:

  • Video track
  • Time Signature track
  • Tempo Track
  • Marker track

You can pin them in the upper section using the divide track feature to keep things clean

Once I’m happy with everything, I save my session as a template so I can easily use it.

Obviously, this is a Steinberg situation that only applies to Nuendo and Cubase, but some of the concepts can be adapted to other DAWs.

Hope this answers your questions,
Medhat

1 Like

I guess creating any template in any Daw is depends on how much Ram you have.
Cuz if you watch any of “Studio time with Junkie XL” videos , Tom has a template in his Cubase around 1000 tracks or so. Just because he has a very powerful PC.
Again you should know your computer well to understand will template be comfortable for you to use or not or maybe you will be comfortable with saving instruments and plugins as strip channels, track presets and so on.
Again if you compose mostly Orchestral music and you have many Kontakt libraries you should understand that each of the library “creates” a huge pressure on your CPU. So if you have let’s say Cinematic Strings 2 , some Albion libraries some Orchestral Tools Like Berlin Strings and Metropolis Ark you should understand that only by uploading all of these libraries only Strings libraries in this case one by one in your DAW with all articulations they have it will create a huge pressure on your CPU. So maybe you don’t have to use all of your libraries with all their articulations at once.
And what to do then? What if you are working on a cue now and wanna use some libraries of Strings , Brass, Percs for layering with your “main” libraries. Again I can tell you a method I use from my experience cuz I have only 8 GB of Ram and cannot replace / update it unfortunately only by buying a new Mac.
You can follow two ways:

  1. Save your instruments as strip channels and organize them by folders so in this case you can create as many strip channels as you want and can upload them anytime you want to so this way will reduce much pressure on your CPU.
  2. Create a template in your Daw with “single” Libraries, what do I mean by that. You can create a very simple Orchestral template by using only “main/ single” libraries you always use for example: let’s say that your need Strings, Brass and Percs .
    So in this case you create all instruments you really need in use all the time like: Violins 1-2, Cellos, Violas, Basses for Strings. And if we take Cinematic Strings as an example so you can use key switches to switch between articulations so no need to create all of articulations at once. The same goes for Brass and Percs.
    If you wanna use Metropolis Ark for layering with Cinematic Strings so you don’t have to create new midi tracks for : Violins, Violas, Cellos and so on you can use the same midi tracks you use for working with Cinematic Strings. But in this case a mixing process can be tricky again if you have little Ram.
    So in this case you can compose any cue you want in your DAW and then export midis as audio tracks to create a multitrack for further mixing process.
    So how it would work? You compose a cue using only Cinematic Strings 2 so then export your midi tracks as audio files, then upload a new strings library like Metropolis Ark to the same midi tracks you had Cinematic Strings on and then export the same midi tracks as audio files but those will be Metropolis Ark audio files. So you’ll have Cinematic Strings audio files and Metropolis Ark for layering.
    Again if you have little Ram.
    If you have lots of Ram you can ignore all of my methods cuz you can work with as many instruments in your Daw as you want to!
3 Likes

And yes if we talk about composing music for a short film, so keep in mind you’ll have a video file in your Daw it also “creates” a pressure on your CPU, so what I did this spring when I was composing a score to a short russian film, I did everything I wrote above, I created a score by using only “one” library per instrument , only one library for Strings, Brass, Percs and so on. And then I did layering stuff like I wrote above again by exporting many audio tracks from the same midi tracks uploading different libraries to the same midi tracks. And then I mixed it all in Pro Tools. And again I uploaded a short film video file to Pro Tools for mixing. But in my case I had no problems with “system overload” in Logic neither in Pro Tools. Again it all depends. And mostly depends on your Ram.

Wow! Thank you for your thorough response! It means a ton to me!
Can’t wait to put some of your suggestions to use!!

1 Like

As I said to Medhat, the thorough response means so much to me! You guys have both given me so much I can do to create a template and improve my workflow!

Thank you!!

2 Likes

That’s John Powell’s 2018 Logic Pro X Template :smiley:

2 Likes